Customize the Navigation Bar
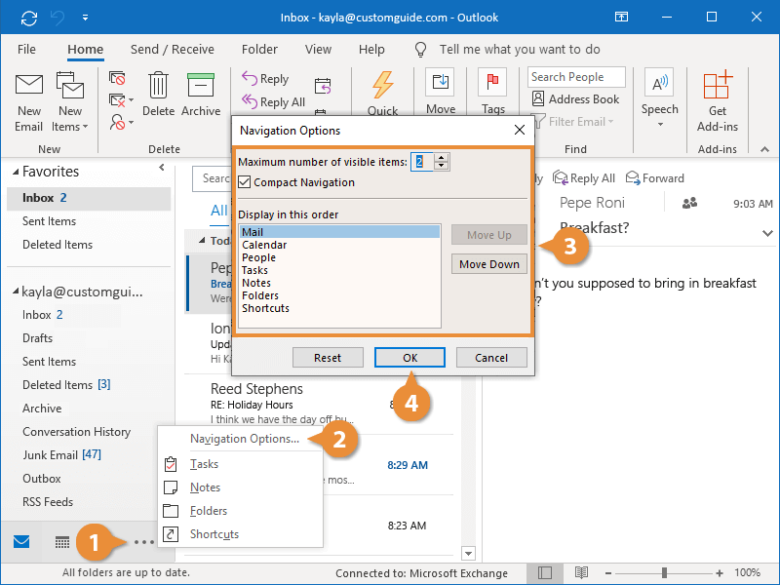
The Navigation Bar normally displays large text buttons for Mail, Calendar, People, and Tasks, but you can customize it to make it work for you.
- Click the More button.
- Select Navigation Options.
- Make changes to the Navigation Bar.
- Change how many links appear.
- Reorder the links.
- (Optional) Choose to compact the Navigation Bar.
- Click OK.

Categories
Categories let you organize your Outlook items into specific groups, making it easier to find what you’re looking for with just a glance. You can choose from the default categories, or you can create your own.
Categorize an Item
- Select an item.
Categories work across all areas of Outlook. This means that you can give emails, meetings, contacts, and tasks the same category designation to keep track of different responsibilities.
- Expand the Tags group, if necessary.
- Click the Categorize button.
A list of categories appears. Outlook includes some color-coded categories by default, but you can create your own.
- Select a category.
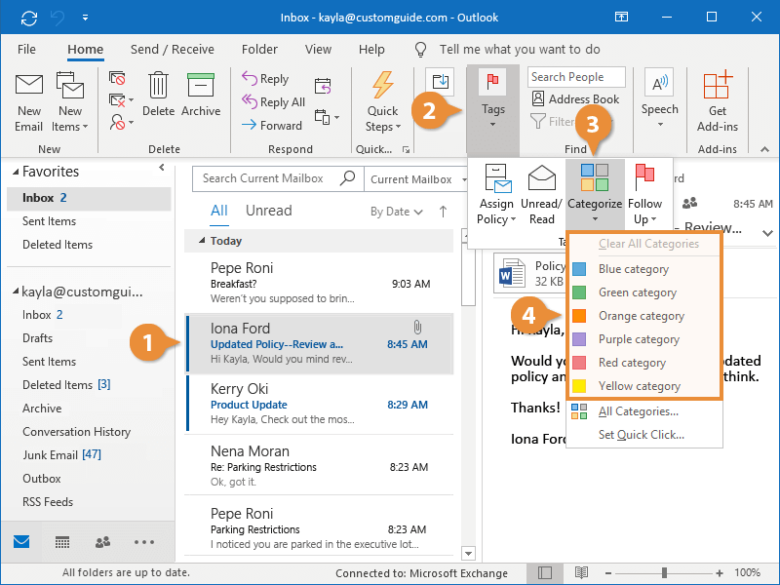

The category is assigned to the selected item.
You can assign multiple categories to an item.
You can also right-click the item, select Categorize and then select a category.
Rename a Category
The default color categories are simply named after the color they use. If you find yourself using them frequently, you can change the name to something more meaningful.
- Expand the Tags group, if necessary.
- Click the Categorize button.
- Select All Categories.

The Color Categories dialog box appears, listing all the categories that have been set up.
4. Select a category.
5. Click Rename.
6. Enter a new name.
7. Click OK.

Customize Folders
Folders are a great way to keep your Outlook items organized. Using folders not only streamlines the appearance of your Outlook, but it can also make it easier to file your items and save you time finding what you’re looking for.
Create a Folder
- Click the Folder tab.
- Click the New Folder button.

The Create New Folder dialog box appears.
3. Enter a name.
4. Select a type of item.
Selecting a type of item from this menu will control which view the folder can be found in, as well as what it can contain.
5. Select the folder’s location.
You can create a folder at the root level of your account by selecting your account at the top, or create a subfolder by selecting another folder.
6. Click OK.

The folder is created.
Right-click the Folder Pane and select New Folder.
Move Items to a Folder
You can move items from one folder to another using the Folder Pane on the left.
- Click and drag an item to a folder in the Folder Pane.

The item is moved into the new folder.
You can also select the item, click the Move button on the Home tab, and then select a new location.
You can use Rules and Quick Steps to automatically move items into certain folders.
Edit a Folder
You can edit a folder to change its name or location.
- Select a folder in the Folder Pane.
- Click the Folder tab on the ribbon.
- Expand the Actions group, if necessary.
- Click the Rename Folder button.
- Enter a new name and press Enter.

The folder is renamed. You can also move a folder to a new location.
6. Expand the Actions group again, if necessary.
7. On the Folder tab, click the Move Folder button.

8. Select a new location.
9. Click OK.

The folder is moved.
Customizing your Outlook can improve productivity and save valuable time while working on emails. For more Outlook training, keep checking our posts under News and Insights on our webpage!